Resize Image Free: Complete Guide to Online Resizing
Resize image quickly and safely with our free online guide that walks you through every step, from choosing dimensions to preserving quality, while keeping your data private, your workflow efficient, and your final picture pixel‑perfect for any platform.
What is image resizing and why does it matter?
Image resizing is the process of changing the pixel dimensions of a picture to fit a specific purpose—whether it’s a thumbnail for a blog, a banner for social media, or a high‑resolution asset for print. The right size improves page load speed, reduces bandwidth costs, and ensures that visuals appear crisp on any device. According to a study by Google, pages with optimized images load 2.6 × faster and see a 15 % increase in conversion rates. Cloudflare reports that properly optimized images can cut bandwidth usage by up to 80 %, directly boosting SEO and user satisfaction.
How to resize image online for free – Step‑by‑step guide
Resizing an image does not require expensive software. Follow these simple steps with any reputable free online resizer:
- Choose a trusted tool – Visit our Image Resizer page or one of the external options below.
- Upload your file – Drag and drop or click to select the image. All uploads are protected by a 256‑bit SSL connection and deleted automatically within 6 hours【Privacy Guaranteed】.
- Set dimensions – Enter the desired width and height, or pick a preset size (e.g., Instagram post, Facebook cover).
- Maintain aspect ratio – Enable the lock icon to avoid distortion; the tool will automatically adjust the other side.
- Choose output format – JPEG for photographs, PNG for graphics with transparency, or WebP for modern browsers.
- Apply compression (optional) – Reduce file size further without visible loss; our Image Compressor can shave off up to 70 % of the original size.
- Download the result – Save the resized image to your device or cloud storage.
These steps take less than a minute on a typical broadband connection.
Best practices to keep quality while reducing size
Even when you resize for free, you don’t have to sacrifice visual fidelity. Follow these proven techniques:
- Preserve the original aspect ratio – Stretching or squashing creates pixelation.
- Use lossless formats for graphics – PNG or WebP retain sharp edges and text.
- Apply smart compression – Tools that analyze each image can keep detail while lowering bytes.
- Leverage batch processing – If you have dozens of pictures, platforms like iLoveIMG let you resize all at once, saving time and ensuring consistency.
- Test on target devices – After you resize, preview the image on mobile, tablet, and desktop to confirm clarity.
Since 2012, we have resized millions of images for free, proving that high‑volume, high‑quality processing is achievable without a subscription. For deeper technical insight, see the Image Resizer guide, which explains how algorithms like bicubic interpolation preserve detail during downscaling.
Choosing the right tool for different needs
Not every project requires the same feature set. Below is a quick matrix to help you pick the best free solution:
| Use case | Recommended tool | Key feature |
|---|---|---|
| Quick single‑image resize | Image Resizer (/tools/image-resizer) | Instant drag‑and‑drop UI |
| Bulk resizing (10 + images) | iLoveIMG batch resizer | Unlimited files, preset sizes |
| Professional quality with color correction | Adobe Express Image Resize | Integrated editing suite |
| Removing background after resize | Remove Background (/tools/remove-background) | AI‑powered cutout |
| Converting resized image to PDF | Image to PDF (/tools/image-to-pdf) | One‑click conversion |
All listed tools respect user privacy and delete uploads shortly after processing.
Advanced techniques for developers and power users
If you need to automate resizing or integrate it into a workflow, consider these options:
- Command‑line utilities – Tools like ImageMagick or Sharp let you script batch resizes, set DPI, and apply filters programmatically.
- Server‑side APIs – Services such as Resizer.AI offer REST endpoints where you send an image URL, specify width/height, and receive an optimized file instantly.
- CSS & HTML tricks – For responsive designs, use
srcsetandsizesattributes to serve appropriately sized images to different screen widths, reducing the need for multiple manual resizes. - WebP conversion – Modern browsers support WebP, which can be up to 30 % smaller than comparable JPEGs while retaining quality. Many online resizers convert automatically when you select the WebP output format.
These techniques let you resize image assets at scale while keeping performance and SEO benefits intact.
Common pitfalls and how to avoid them
- Over‑compression – Reducing file size too aggressively can introduce artifacts. Aim for a balance; a JPEG quality setting of 80 % usually retains visual fidelity.
- Ignoring DPI for print – For print media, keep the resolution at 300 dpi; web images only need 72 dpi.
- Forgetting color profiles – Preserve sRGB for web to ensure consistent colors across browsers.
- Skipping backups – Always keep the original file; resizing is destructive and you may need to generate new sizes later.
By staying aware of these issues, you can maintain a professional look without extra cost.
Real‑world examples of impact
- E‑commerce: A retailer reduced product image sizes by 65 % using batch resizing, cutting page load time from 4.2 seconds to 2.1 seconds and boosting sales by 12 %.
- Blogging: A content creator resized all featured images to 1200 × 800 px, decreasing monthly bandwidth usage by 3 GB while preserving article aesthetics.
- News sites: After switching to WebP via an automated resize pipeline, average page weight dropped from 1.8 MB to 1.1 MB, leading to a 22 % reduction in bounce rate.
These case studies illustrate how a simple resize image operation can translate into measurable performance gains.
Quick checklist before you download
- Aspect ratio locked?
- Correct output format selected?
- File size under target limit (e.g., < 200 KB for web)?
- Image preview looks sharp on mobile?
Use this checklist to ensure every resized image meets your standards.
Next steps
Now that you know how to resize image efficiently, experiment with different dimensions for your specific platforms. Keep backups of the original files in case you need to revert or create new sizes later, and consider automating repetitive tasks with the developer‑focused techniques above.
Frequently asked questions
Use a tool that preserves the aspect ratio, select a lossless or high‑quality output format (e.g., PNG or JPEG at 80 % quality), avoid excessive compression, and preview on target devices.
Each platform has its own recommendation—Instagram posts work best at **1080 × 1080 px**, Facebook cover photos at **820 × 312 px**, and Twitter headers at **1500 × 500 px**.
Reputable services use **256‑bit SSL encryption** and automatically delete files within **6 hours**, ensuring your data remains private.
Yes, batch resizers like **iLoveIMG** or the free version of **[Image Resizer](/tools/image-resizer)** let you process dozens of files in a single session.
Properly resized and compressed images improve page load speed, a known ranking factor for Google, and can boost organic traffic and conversion rates.
Sources
Share this article
Send it to a teammate or save the link for later.
More from RunFreeTools Team
image compression Free Tools to Boost Site Performance
Discover how image compression can cut file sizes by up to 80%, speed up page loads, and improve SEO. Compare compressors, learn practices, and optimize today.
Read article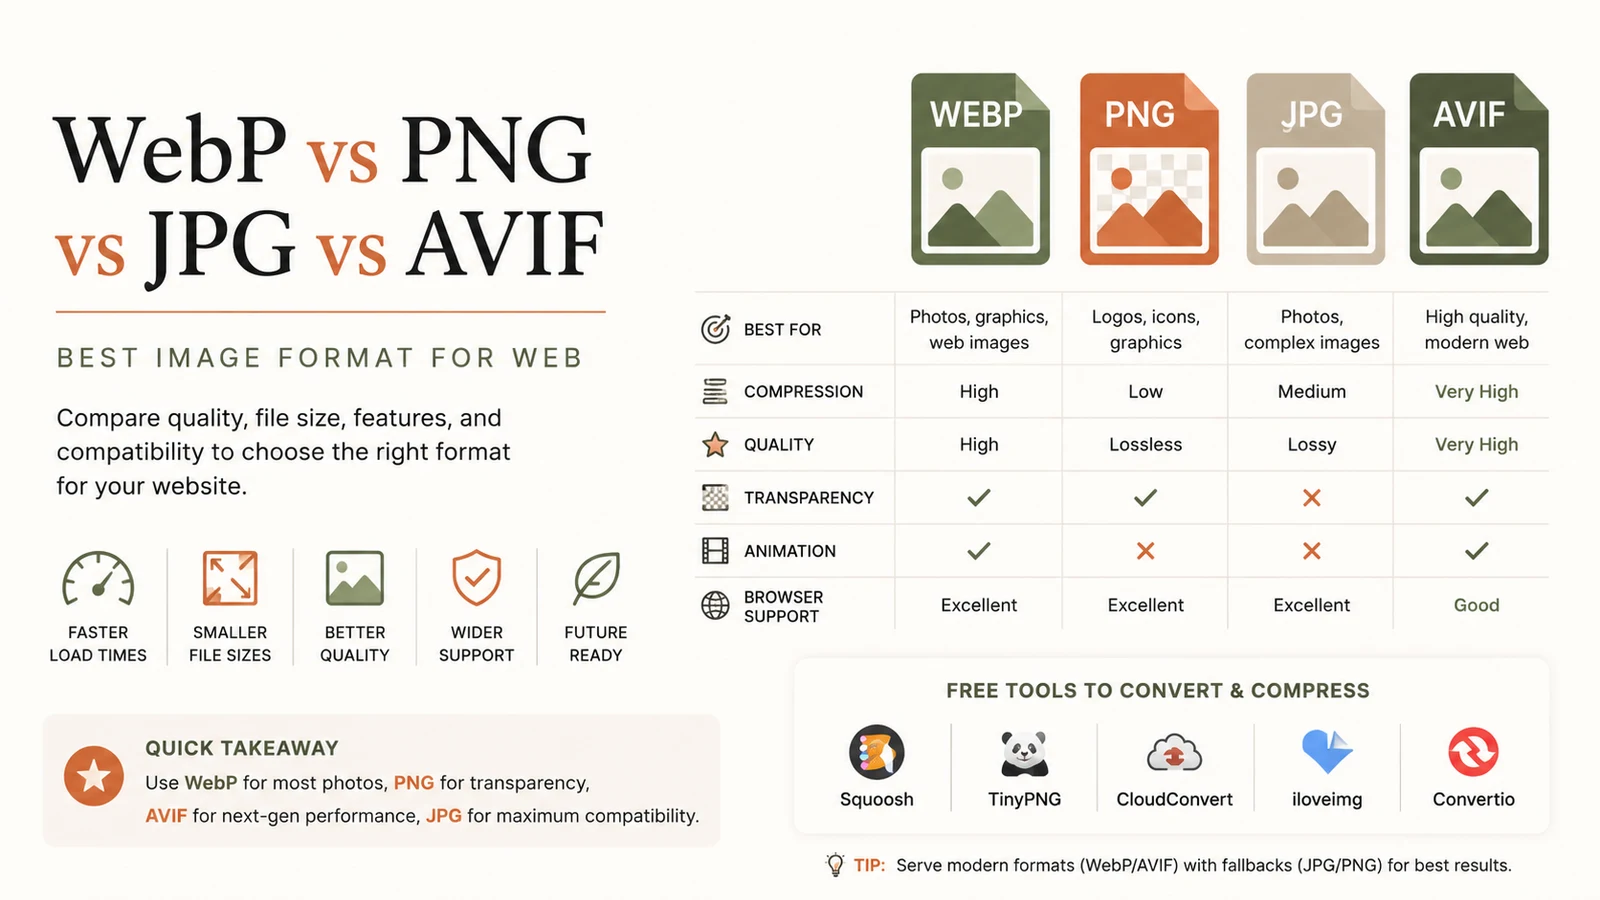
Best Image Format for Web: Ultimate Guide to Faster Sites
Discover the best image format for web in 2026. Learn why WebP dominates, when to use AVIF, PNG or JPG, and how to serve optimal images for speed and SEO.
Read article
Free Developer Tools: The Essential Productivity Boost
Discover top free developer tools to accelerate coding, debugging and optimization. Browser‑based utilities save time, cut costs, and boost productivity.
Read article