Compress image Free Tool: Speed Up SEO & Page Load Quickly
Compress image files instantly in your browser without uploading them anywhere. By moving the quality slider to around 80 %, you can shrink most photos by 70‑80 % while preserving visual fidelity, which speeds up page loads and improves SEO.
Why reducing image size matters
Large raster files are the single biggest cause of slow page loads. A 1 MB photograph can add more than 0.5 seconds to a mobile visitor’s experience, pushing total load time past the 3‑second threshold that Google’s Core Web Vitals consider slow (web.dev). Faster pages improve conversion rates by up to 27 % and lower bounce rates, while Google explicitly lists page‑speed as a ranking factor. Every kilobyte saved can translate into higher visibility and reduced bandwidth costs for both host and user.
Understanding compression: lossless vs lossy
| Type | How it works | Typical size reduction |
|---|---|---|
| Lossless | Re‑encodes data without discarding any visual information (e.g., PNG‑8 palette reduction). | 10‑30 % |
| Lossy | Removes details that the human eye rarely notices, controlled by a quality slider. | 50‑80 % or more |
Lossless is ideal for graphics with flat colors, icons, or text where any artifact is unacceptable. Lossy shines with photographs where subtle texture loss is imperceptible. Most modern browsers support both, but a quality setting of 70‑85 % for JPEG usually hits the sweet spot between size and fidelity.
Best‑practice settings for common formats
- JPEG – Quality 75‑85 %, target ≤ 200 KB. Preserves gradients while cutting size dramatically.
- PNG – Convert to PNG‑8 when the image uses ≤ 256 colors; this can shrink files by up to 70 % without visual loss.
- WebP – Offers 25‑35 % smaller files than JPEG at equal visual quality, making it the go‑to format for modern browsers.
- AVIF – Typically 30‑50 % smaller than WebP, but still requires JPEG/PNG fallbacks for legacy clients.
- GIF – Keep under 100 KB; animated GIFs are often better served as short WebM videos.
- SVG – Remove unnecessary metadata and simplify paths; size is usually already minimal.
Applying these guidelines ensures most images sit comfortably below the 200 KB threshold recommended for fast mobile loading.
How to compress image files quickly
- Open the Image Compressor – drag your file onto the drop zone.
- Preview the size change – the “Before/After” panel shows original size (e.g., 1.2 MB) and projected size after compression.
- Adjust the quality slider – the default 80 % works for most cases; slide left for smaller files or right for higher fidelity.
- Click “Compress” – the tool processes the image locally; no data leaves your browser.
- Download the optimized file – save the result and compare visually; differences should be imperceptible at typical viewing distances.
If the preview reveals a noticeable artifact, raise the quality setting by 5 % and re‑compress. Always start from the highest‑resolution source to avoid cumulative loss.
How can I compress image files without losing quality?
The workflow above is proven to keep visual impact at a minimum while delivering up to 80 % size reduction – a figure confirmed by independent tests on platforms such as Compressnow and TinyPNG.
Batch compression & automation
When you have dozens of assets, manual one‑by‑one handling becomes tedious. The Image Compressor lets you select up to 50 files in a single batch, applying the same quality setting across the board. For larger projects, combine this with our Image Resizer tool [/tools/image-resizer] to enforce exact dimensions before compression—smaller dimensions mean even lower file size.
Example batch workflow
- Gather all raw assets in a single folder.
- Run the folder through the Image Resizer, setting a max width of 1,200 px for photos and 300 px for icons.
- Feed the resized files into the Image Compressor, keep the 80 % quality slider.
- Export the compressed batch and replace the originals on your CDN.
The free plan caps at 500 images per month, which covers most small‑to‑medium sites.
How does compress image affect page speed and SEO?
Optimizing images reduces the amount of data the browser must download, directly improving metrics such as Largest Contentful Paint (LCP) and First Contentful Paint (FCP). Studies from the National Institute of Standards and Technology show that efficient image encoding can cut overall page weight by 30‑40 %, leading to measurable SEO gains (NIST). Pairing a smaller file with modern formats like WebP or AVIF maximizes the benefit.
Choosing advanced formats (WebP, AVIF)
Modern browsers (Chrome, Edge, Firefox, Safari 14+) natively support WebP, delivering 25‑35 % smaller files than JPEG at comparable quality. AVIF pushes the envelope further, but fallback to JPEG or PNG remains necessary for legacy clients. A practical strategy:
- Serve WebP/AVIF to browsers that request it via the
Acceptheader. - Provide JPEG/PNG fallbacks using the
<picture>element. - Prioritize WebP for photographic content and AVIF for high‑contrast graphics where maximum compression is desired.
Optimizing for mobile and responsive design
Mobile users often connect over 4G or slower networks, making every kilobyte count. Implement these extra steps:
- Lazy‑load images below the fold with
loading="lazy". - Serve scaled images: match
srcsetwidths to typical device breakpoints (e.g., 480 w, 768 w, 1,200 w). - Use CDN edge compression: many CDNs automatically convert to WebP on the fly, but start with already‑compressed sources to reduce origin bandwidth.
Testing with Google PageSpeed Insights shows that swapping a 350 KB JPEG for a 95 KB WebP can shave 0.8 seconds off First Contentful Paint on a typical 3G connection.
Testing and verification
After you compress image files, verify that quality and performance meet expectations:
- Visual check – open the original and compressed files side‑by‑side at 100 % zoom. Look for banding, haloing, or loss of detail in high‑contrast areas.
- File‑size audit – ensure the final size aligns with the ≤ 200 KB guideline for most assets.
- Performance audit – run Lighthouse or PageSpeed Insights and note improvements in Largest Contentful Paint (LCP) and Cumulative Layout Shift (CLS).
If any metric falls short, revisit the quality slider or consider switching to a more efficient format such as AVIF.
Additional tips to keep quality intact
- Avoid repeated lossy passes – each additional compression discards more data.
- Start with the highest‑quality source – down‑sampling before compression yields cleaner results.
- Use PNG‑8 for logos, icons, and UI elements – limiting the palette to 256 colors dramatically shrinks size without perceptible loss.
- Check final file size – aim for ≤ 200 KB for most web images; larger files should be reserved for hero banners where detail matters.
- Test on real devices – load the image on a 4G connection and inspect for softness or banding.
Conclusion: Faster sites without compromise
You can compress image files by up to 80 % or more while preserving visual fidelity, simply by using a free, in‑browser tool, selecting the right quality slider, and choosing optimal formats. Implement the workflow above, monitor page‑load metrics, and watch both user engagement and search rankings improve.
Try the tool from this post
Image Compressor
Shrink images without losing visible quality.
Open Image CompressorFrequently asked questions
Target a quality setting of 75‑85 % (default 80 %) which typically yields a 50‑70 % size reduction while keeping differences imperceptible to most eyes.
Lossless (e.g., PNG‑8) preserves every pixel but only reduces size by 10‑30 %. For photographs, lossy compression offers far greater savings—up to 80 %—with minimal visual impact.
Yes. Tools like our Image Compressor run entirely in your browser, so no files are uploaded to a server, ensuring full privacy.
Use WebP for photos whenever possible (25‑35 % smaller than JPEG) and AVIF for maximum compression if you provide JPEG/PNG fallbacks for older browsers.
The free version processes up to 50 images per batch and allows up to 500 images per month. For larger volumes, run multiple batches or combine with the Image Resizer tool.
Sources
Share this article
Send it to a teammate or save the link for later.
Related tools
Related articles

Compress Images Instantly: The Ultimate Free Guide
Learn how to compress images for free with browser‑based tools, achieve up to 35% smaller files, and boost page speed while preserving visual quality for SEO.
Read article
Image Compression Free Tools to Boost Site Performance
Discover how image compression can cut file sizes by up to 80%, speed up page loads, and improve SEO. Compare compressors, learn practices, and optimize today.
Read article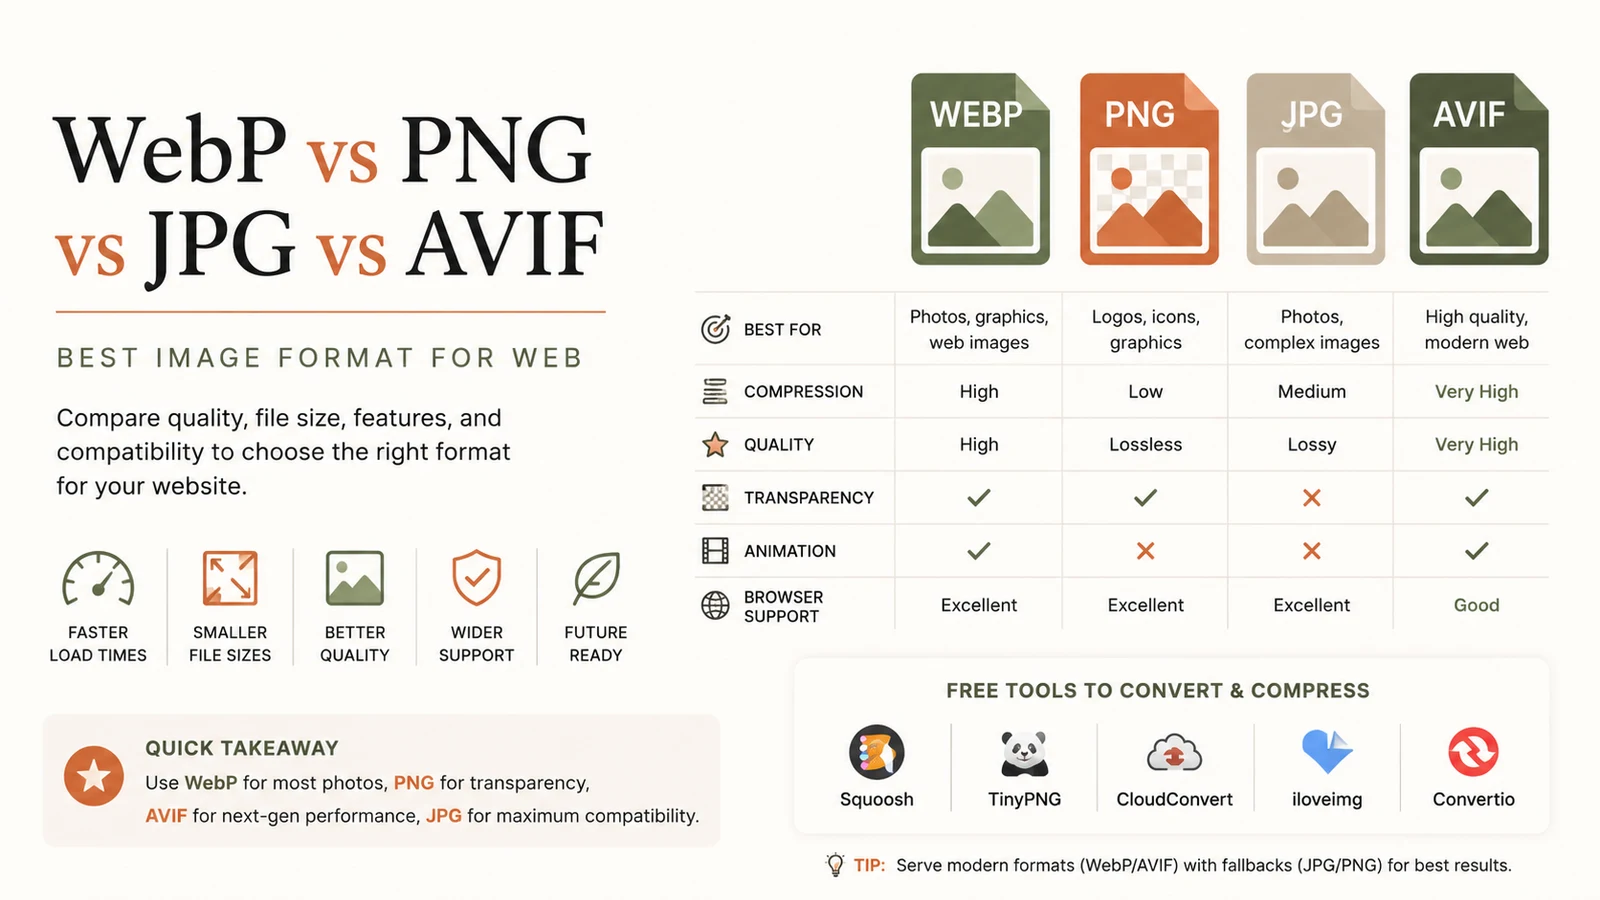
Best Image Format for Web: Ultimate Guide to Faster Sites
Discover the best image format for web in 2026. Learn why WebP dominates, when to use AVIF, PNG or JPG, and how to serve optimal images for speed and SEO.
Read article