Remove Image Background Free: One-Click Cutout (2026)
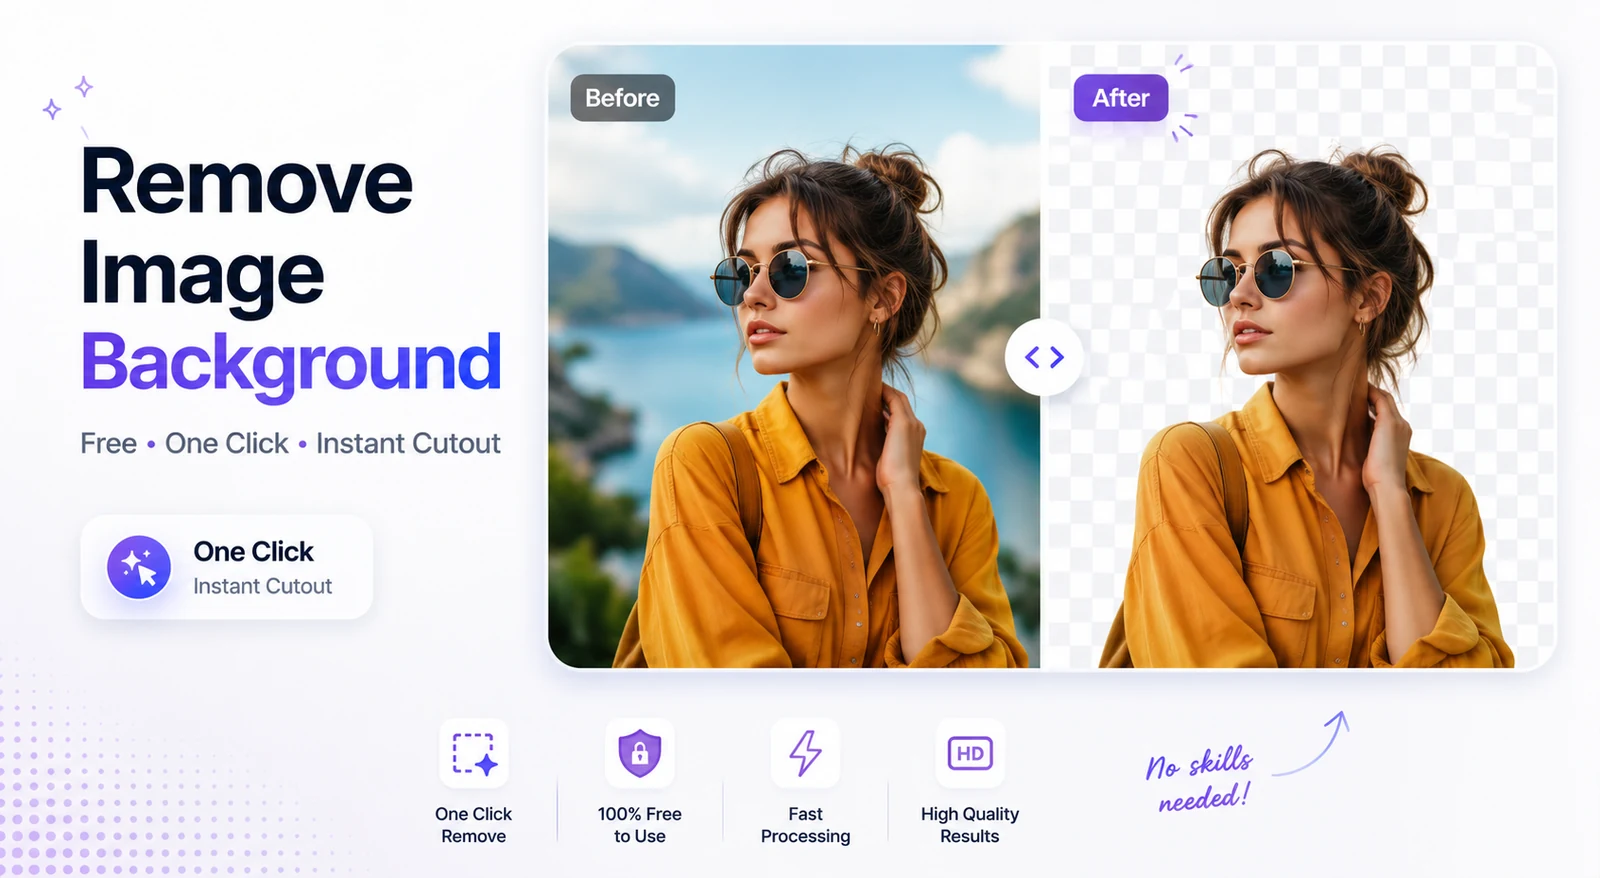
Remove an Image Background Free in One Click
The fastest free way to remove an image background is an in-browser AI cutout tool. Upload your photo, and the AI detects the subject and erases everything behind it in about a second, leaving a transparent PNG you can drop onto any color. No Photoshop, no manual tracing. Use the free background remover to do it without a watermark or sign-up.
That single step replaces what used to be ten minutes of clicking around a selection tool. Modern background removers read your image, separate foreground from background pixel by pixel, and hand back a clean cutout ready to use as a logo, a product shot, a profile picture, or a sticker. The catch is that a lot of "free" tools quietly attach strings, and the difference between a usable cutout and a frustrating one usually comes down to how the tool handles edges. This guide walks through both: how the technology works now, the exact steps to a clean result, and the traps to avoid.
How AI Background Removal Actually Works Now
A few years ago, removing a background meant drawing a path by hand or fighting with a magic-wand selection. In 2026 it is a machine-learning job. The tool runs your image through a segmentation model, a neural network trained on millions of photos to recognize where a subject ends and the background begins.
Under the hood, today's tools chain a few stages together. First, a segmentation transformer produces a rough map of what is subject and what is background. A second detail branch zooms in on the borders to catch fine features like hair, fur, and frayed fabric. Then an alpha matting step turns hard, jagged edges into soft, natural transitions, and a color-decontamination pass scrubs any leftover background tint clinging to the subject. The descendants of older models like U²-Net and MODNet have given way to sharper architectures, but the practical takeaway is simple: the AI does the selecting, and the good tools spend their effort on the edges where the eye notices mistakes.
What this means for you:
- One click, not ten. You do not select anything. You upload, and the cutout appears.
- Edges are where quality lives. Easy shapes (a bottle, a phone) come out perfect almost everywhere. Hair, fur, and glass are where tools separate.
- Output is a transparent PNG. Transparency is stored in the file's alpha channel, which is why PNG is the default export and JPG is not.
Step-by-Step: From Photo to Clean Cutout
Here is the full workflow, start to finish. The whole thing takes under a minute for a typical image.
1. Upload your image. Open the background remover and drop in a JPG, PNG, or WebP. A higher-resolution source gives the AI more detail to work with, so start with the largest version you have.
2. Let the AI auto-cutout. The tool processes the image and returns the subject on a transparent checkerboard. That checkerboard pattern is not part of the image; it is how editors display transparency. In a browser-based tool like this one, the processing happens on your device, so the photo never leaves your machine.
3. Refine the edges. Most cutouts are good immediately, but check the tricky areas. Zoom in and look for missing hair strands, a chewed-up outline, or a faint glow of old background color (a "halo"). Brush detail back in or erase stray bits with the refine controls.
4. Choose transparent or a solid background. Decide what goes behind the subject. Keep it transparent for logos, overlays, and stickers. Drop in solid white for marketplace product shots, or any brand color for thumbnails and ads.
5. Export. Save as PNG to preserve transparency, or as JPG if you have placed the subject on a solid background and want a smaller, flattened file. Then resize for wherever it is going.
Quick gut-check before you export: preview the cutout on both a white and a dark background. Halos and rough edges hide on white and scream on charcoal. If it looks clean on both, you are done.
Use Cases and the Right Output for Each
Different jobs want different output. A transparent PNG is perfect for a logo and wrong for an Amazon listing. Match the export to the destination.
| Use case | Recommended output | Tip |
|---|---|---|
| Product photo for Amazon | White-background JPG | Amazon's main image must be pure white at RGB 255,255,255; flatten on white, do not upload a transparent PNG |
| Product photo for Etsy / lifestyle | Transparent PNG | Etsy allows styled backgrounds; keep it transparent so you can composite onto any scene |
| Logo cleanup | Transparent PNG | Removes the white box around the logo so it sits on any color or photo |
| Handwritten signature | Transparent PNG | Photograph the signature on white paper, cut it out, and overlay it on contracts, PDFs, or email footers |
| LinkedIn / profile picture | Solid color or new background | Swap the messy room behind you for a clean studio tone; export JPG once composited |
| Stickers and memes | Transparent PNG | Crisp edges matter; check the outline at 200% before saving |
Products on white. This is the most common e-commerce task and the one with the strictest rules. After the cutout, place the item on a white layer and export JPG. A transparent PNG can render gray in some marketplace upload previews, which fails the pure-white check, so a baked-in white JPG is the safe move. Aim for at least 2,000 pixels on the long side so the zoom feature works.
Profile pictures. Remove the distracting background, then drop in a neutral gray or soft brand color. The goal is for your face, not the clutter behind you, to carry the frame. Watch the edges of your hair against the new color.
Logos and signatures. Both are usually shot or scanned on white. The AI deletes the white and leaves only the marks, so a transparent PNG logo drops cleanly onto a colored header, and a transparent signature overlays onto a document without a white block around it.
Getting Clean Hair and Fine Edges
Hair is the classic stress test. A weak tool gives you a helmet-shaped blob; a good one keeps the wispy strands. Here is how to get a natural edge:
- Start with contrast. The AI separates a subject from the background most cleanly when the two differ in color and brightness. Dark hair on a light wall cuts beautifully; dark hair on a dark couch is a fight. If you can choose the source photo, choose the contrasty one.
- Lean on alpha matting. The reason modern cutouts look soft instead of cut-with-scissors is alpha matting, which gives edge pixels partial transparency. You do not configure it; you just benefit from a tool that does it well.
- Inspect at 200%. Zoom in on hair and edges. Real flaws are invisible at fit-to-screen and obvious up close.
- Test on light and dark. Place the cutout on both. A halo of leftover background color is the most common defect, and it only shows on a dark backdrop.
- Brush back missing strands. If the AI ate a few wisps, paint them back with the refine tool. For a stubborn gap, a couple of low-opacity strokes that taper at the ends look natural without obvious cloning.
Glass and motion blur follow the same rules: more contrast and a careful edge pass go further than any single setting.
The "Free" Gotchas to Avoid
Here is the honest part. Plenty of tools advertise "free" and then meter you at the finish line, usually after you have already invested time uploading and tweaking. Know the traps before you start:
- Watermarks. The cutout looks great in preview, then the download arrives stamped with a logo. Free-tier watermarks are the single most common dealbreaker for any real use.
- Locked HD / low-res downloads. Some popular tools let you remove the background for free but only export a small, low-resolution file, with full-quality HD gated behind paid credits at a dollar or two per image. Fine for a thumbnail, useless for print or a clean product page.
- Sign-up walls. "Free" that demands an account and a verified email before you can download is not friction-free, and it usually pairs with a credit limit anyway.
- Daily file caps. Two or three free images per day is generous for a one-off and painful if you are clearing a product catalog.
- Upload-and-pray privacy. Many tools send your image to a server to process. For sensitive material (an ID, a signature, an unreleased product), an in-browser tool that processes on your device is the safer call. If privacy is a concern for you, see are online tools safe for what to check.
This is exactly why RunFreeTools built its background remover the way it did: full-resolution export, no watermark, no account, and the processing runs in your browser. The cutout you preview is the cutout you download.
Converting and Resizing Your Cutout
A transparent PNG is the starting point, not always the finish line. Two quick follow-ups cover most needs.
Need a white-background JPG? When a marketplace or form wants a solid white image instead of transparency, run your PNG through the image converter. It flattens the transparent area onto white and outputs a JPG ready for Amazon or a passport-photo form. JPG is also a smaller file, handy when an upload has a size limit. If you are working with phone photos saved in Apple's format, converting HEIC to JPG first keeps everything compatible.
Need a specific size? Every platform has its own dimensions, and uploading the wrong size gets your image cropped or rejected. Use the image resizer to hit the target: 2,000 px square for an Etsy listing, 2,000+ px on the long side for an Amazon main image, or 400 by 400 for a profile picture. Resize after the cutout, not before, so the AI has the most detail to work with.
If the final file is heavier than an upload allows, run it through the image compressor to shrink the size without a visible quality drop, much like you would compress a PDF without losing quality before emailing it.
Putting It Together
Removing a background used to be a skill. Now it is a click, and the only judgment left to you is on the edges and the export. Start with the highest-resolution photo you have, let the AI do the cutout, check hair and fine detail at 200%, and pick your output: a transparent PNG for logos, signatures, and overlays, or a flattened white JPG for marketplace listings. Steer clear of the tools that ambush you with a watermark or a low-res download at the end, convert and resize the result for its destination, and you have a clean, professional cutout in under a minute, for free.
Try the tool from this post
Background Remover
Erase image backgrounds automatically.
Open Background RemoverFrequently asked questions
Open a free AI background remover, upload your JPG or PNG, and let it auto-detect the subject. The tool erases the background in a second or two and gives you a transparent cutout. Refine any rough edges, then export as a PNG. A browser-based tool like RunFreeTools needs no sign-up and adds no watermark.
PNG. It supports an alpha channel, so transparent areas stay transparent when you place the image over any color. JPG cannot store transparency and will flatten the empty space to white. Export PNG for logos, stickers, and overlays; export JPG only when you want a solid white or colored background baked in.
Use a tool with alpha matting, which softens hard edges into natural transitions instead of a jagged outline. After the auto-cutout, zoom to 200% and check hair against both a light and a dark background. Brush back any missing strands with a refine tool, and watch for a faint halo of leftover background color.
Upload the image to an AI remover; it isolates the subject and deletes the white area, leaving a checkerboard that represents transparency. Export as PNG to keep that transparency. This is the standard fix for logos and signatures shot on white paper that you want to drop onto colored backgrounds or documents.
Many are not fully free. Common catches include a watermark on exports, low-resolution downloads with HD locked behind credits, a forced sign-up, or a daily file cap. Read the export step before you commit time. A genuinely free tool exports full resolution with no watermark and no account.
Yes. Remove the original background, then place the cutout on a solid white layer and export as JPG. Marketplaces like Amazon require a pure white main image at RGB 255,255,255, so a flattened white JPG is safer than a transparent PNG, which can render gray on some upload previews.
Share this article
Send it to a teammate or save the link for later.
Related tools
Related articles

Remove Background from Images Instantly – Free AI Tool
Easily remove background from images with free AI tools—get transparent PNGs in seconds, batch process up to 500 files, and boost e‑commerce conversions.
Read article
World Cup 2026 Schedule PDF: Make a Free Printable Wall Chart
Get the World Cup 2026 schedule PDF and build a free printable bracket wall chart in your browser. Key dates, 12 groups, knockout rounds and the July 19 final.
Read article
How Many Days Until July 4, 2026? (America's 250th)
As of June 19, 2026, it is 15 days until July 4, 2026 — America's 250th birthday and the Semiquincentennial. Count down to the date and see what's planned.
Read article